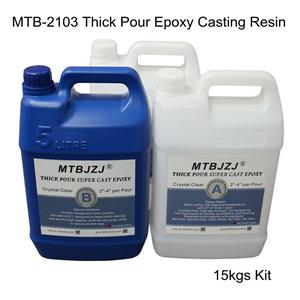
MTB-6048 Epoxy Art Casting Resin,3:1
MTB-6048 Epoxy Art Casting Resin,3:1

Castin’craft Casting Resin Basics, Instructions And Tips
Basics Of Resin Casting
Resin casting is an exciting and fun craft that allows you to embed or encase almost any object in crystal-
clear plastic. The basic materials needed to get started in resin crafting are easy to find and relatively inexpensive.
You'll need:
1. Casting resin and catalyst
2. Disposable graduated paper mixing cups
3. Wooden stir sticks
4. A mold
5. Objects you wish to embed
Color dyes and pigments are optional and can be used to create a variety of special effects and backgrounds.
Resin crafting supplies are available at hobby, craft and plastics supply stores.Understanding the basics of how casting resin can be changed from a liquid to a solid will enable you to successfully create a wide variety of both practical and fanciful projects that will last indefinitely!
CASTING RESIN
An epoxy resin noted for its clarity and ability to be cast in mass. In its liquid form, casting resin has a consistency of corn syrup and a slight color ranging from straw to light aqua. During the hardening process the slight color bleaches out and the resin becomes crystal clear. The styrene odor of casting resin is less objectionable if you have good ventilation when pouring. Once cured, your cast pieces will have little if any odor. Casting resin should be stored at room temperature (72° F.), out of direct sunlight, and out of reach of children. If stored properly, shelf life is approximately nine to twelve months.
CATALYST/HARDENER
Added to liquid casting resin, catalyst (hardener) produces a chemical reaction, which generates heat, causing the resin to harden. The amount of heat generated depends upon four factors:
Amount of catalyst used
Thickness of the casting
Air temperature and temperature of casting resin
Amount of color pigment or dye (if used)
Increasing any of these factors alone or in combination changes the rate of curing or hardening. For example…
ncreasing the amount of catalyst causes the resin to cure more quickly. Over-catalyzing, however, can cause excessive heat,fractures in the cast piece, fading of embedment’s, or distortion of the mold. Under catalyzing may produce a cast piece with a sticky or tacky surface.
A thick casting cures more quickly than a thin casting.
The higher the room temperature, the faster a casting will cure.
Adding too much color will slow down or inhibit the cure.
During the curing process, the catalyzed resin goes through a series of stages from a liquid to a 'soft gel' in about 15 to 20 minutes, a 'firm gel' in 20- 30 minutes and finally to a 'click-hard'(cured) stage in 1 to 24 hours. The length of this cycle will vary greatly depending on the four factors mentioned previously. The period of time between the addition of the catalyst and the gel stage is called the 'working time' or 'pot life' of the resin. Generally this is about 15 to 20 minutes. Do not catalyze more resin than you can pour during the 'working time' since catalyzed resin cannot be poured once it has gelled. Do not pour catalyzed resin back into your casting resin can. Catalyst should be stored at room temperature, out of sunlight and out of reach of children.Shelf life is indefinite as long as stored properly.
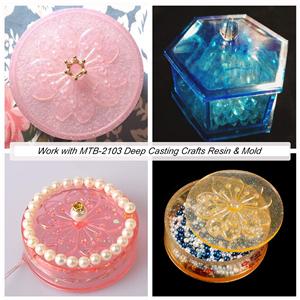
Embedments
Here are some suggested objects that can be suspended or encased in casting resin:
Crushed glass Coins Fabric Flowers - dried or pressed Glass jewels or marbles Glitter Insects or biological
specimens Jewelry findings Leaves -dried or pressed Mechanical parts, nuts bolts etc. Metalcoins or engraved
plates Paper Photographs Rocks,pebbles, gravel Seeds, peas, beans, pasta, spices Sequins ?Shells ? Smaller
resin castings Stamps, paper money Wood
Seal objects that have a tendency to 'wet out' or darken when a liquid is poured over them. Ultra-SealTM vinyl resin glue/sealer or 4 parts white glue to 1 part water works well. Brushed on coats of glue or sealer should be allowed to dry completely before embedding the coated object in casting resin. Any embedment must be dry, wax-free and grease-free for the resin to adhere well.Embedding plastic pieces requires experimentation as the heat generated during casting may cause some plastics to distort. For example ... acrylic, polyethylene and polypropylene plastic pieces seem to be more heat-resistant than those made of vinyl or styrene based plastic.Any embedment must be dry, wax-free and grease-free for the resin to adhere well. Embedding plastic pieces requires experimentation as the heat generated during casting may cause some plastics to distort.For example acrylic, polyethylene and polypropylene plastic pieces seem to be more heat-resistant than those made of vinyl or styrene based plastic.
Colorant
Use only dyes and pigments designed for use with epoxy casting resin. Dyes are generally transparent, allowing you to 'see through' the cast piece. Pigments are generally opaque, providing a solid. Colorants may be used to color an entire casting or can be used in the final layer to create a background. Keep in mind that colored resin in your mixing container will look much darker than when poured into a thinner area. As a general rule 2 to 3 drops of colorant per ounce of resin will produce the desired intensity of color.
Molds
A variety of mold materials can be used for resin casting…
Oven-proof glass, such as PyrexTM Latex, natural rubber,Flexible vinyl plastisol,Metal, aluminum, stainless steel,Silicone, R.T.V. rubber
Ceramic,Polypropylene and polyethylene,Polyurethane elastomers
(Note: Some mold types require the use of a mold release to keep the casting from sticking to the mold.)
Steps To Perfect Resin Casting With
'poly' Molds Preparation
Read all instructions before starting your project! These include manufacturer's label cautions as well as project directions.
Choose a well-ventilated area away from any food preparation,where a room temperature of 65° to 75° F. can be maintained.
Cover a level working surface with MylarTM plastic sheeting,several layers of wax paper secured over newspapers, or sheets ofplastic wrap taped to your work surface. (MylarTM is available at art and graphic supply stores and at plastic supply stores.)
Gather all materials before starting your project.
Keep acetone or rubbing alcohol handy for cleanup of liquid casting resin.
Measure resin
Determine the number of layers to be poured and the amount of resin required for your first layer. If the mold you are using does
not state the number of ounces it contains, fill the mold with water and then pour into a measuring cup to determine the total
amount of resin that will be needed.
Allow plastic poly molds to air-dry to avoid scratches; nonplastic molds may be dried with a lint-free cloth or paper towel.
Use a wax-free disposable paper measuring/mixing cup with ounce graduations for accurate measuring of resin.
Do not use Styrofoam or clear plastic cups as they will melt when contacted by catalyzed resin.
Use a clean cup and stir stick for each batch of resin mixed.
Pour the appropriate amount of casting resin into your disposable measuring/mixing cup.
Important! Poly Mold Catalyst Chart
This chart is intended as an approximate guide only, and is expressed in drops of catalyst per ounce of resin. It is based on a room temperature of 70°-75°F. For warmer temperatures, decrease catalyst by a drop per ounce of resin; for cooler temperatures, increase the amount of catalyst by a drop per ounce of resin. It may be necessary to experiment to determine the correct amount of catalyst for your specific conditions.
Note: When using poly molds 1 thru 5, use the higher numbers of drops of catalyst recommended.
When using their poly molds 6 thru 8, use the lower number of drops of catalyst recommended.
Note: If pouring more than five layers, keep in mind that each catalyzed layer adds to the build-up of the heat during the curing process. You'll need to experiment to determine the number of drops of catalyst for each layer that will allow a good, hard cure without fracturing around embedment’s.
Use disposable wooden stir sticks or tongue depressors for mixing.
Add colorant (optional)
Add just a little dye or pigment at a time until the desired shade is achieved. Generally, two or three drops of colorant per ounce of resin will provide the intensity desired. Too much colorant will inhibit the cure of the resin.
Remember ... the color will look darker in the cup than in the casting, due to the depth of the container.
Stir well to blend.
add catalyst
The size of the mold, the depth of the pour and your room temperature will determine the amount of catalyst used.
Following the chart opposite or the resin manufacture's label directions, add the appropriate amount of catalyst to the casting resin. It is very important to be exacting in this step to assure proper curing.
mix thoroughly
Using a stir stick or tongue depressor, mix resin and catalyst thoroughly and vigorously for at least one minute. Scrape the sides and bottom of cup with your stir stick to insure proper mixing of resin and catalyst.
pour into mold
Make sure mold is clean,dry and level before pouring. Do not pick up or move the mold once you have poured
the first layer.
allow to gel
Resin will gel [to consistency of set Jell-O TM) in about 15 to 25 minutes. Test the surface with a stir stick. There must be sufficient firmness to support the weight of your embedment’s. If surface has not reached a firm gel, wait a few more minutes and test again with your stir stick.
Layers in a casting must not be allowed to fully cure or harden until the final layer has been poured. A fully cured layer will shrink away from the sides of the mold, allowing an additional pour to run down the sides of the previous layers. If this should occur, it would necessitate a lengthy sanding and polishing job.
place your embedments
remember… you are layering in reverse. The first layer you pour becomes the front of your cast piece.
Put embedment’s in place face down on top of the gelled layer.
tips to prevent trapping air bubbles
When embedding items that may entrap air bubbles on their 'face', pour half of your next batch of catalyzed resin into the mold before placing the embedment’s. Then, lower embedment’s slowly into the resin to expel air bubbles.
For a dimensional object such as a dried flower, dip it into your next batch of catalyzed resin before placing face down onto the gelled surface.
Gently press embedment’s with your stir stick to free trapped bubbles.
Pour additional layers
Additional layers of embedment’s will give the appearance of greater depth and a dimensional 'floating' look.
Referring to the Catalyst Chart, add layers, repeating the procedure previously outlined. Be sure to allow each layer to gel before adding embedment’s.
For the final layer you may wish to create a background using colorants. Generally, 2-3 drops of dye or pigment per ounce of casting resin will produce the desired color without inhibiting the cure. Dye or pigment is added to the resin in addition to catalyst.Make sure the previous layer has firmly gelled before pouring the final color layer. Do not
overfill your mold.
Special note
Also in combination with colorant you may use 6 to 8 drops of a surface-curing agent per ounce of resin. Surface curing agent is used in addition to catalyst and resin to produce a tack-free surface. [When a surface curing agent is used without colorant,the appearance of the final layer will be slightly hazy rather than clear.)
Remove casting from mold
Tap the surface of your cast piece with a clean stir stick. When cured, it will 'click hard' without sticking when tapped. The edges of the cast will have shrunk away from the sides of the mold and all or part of the face of the mold.
If surface tackiness remains, allow up to several days hardening time, checking periodically.
Grasp the mold by the edges, invert over a clean piece of plastic wrap and flex the mold as you would an ice cube tray.
The cast, if properly catalyzed and hardened, should drop out of the mold easily.
To minimize blemishes and fingerprints, do not handle your casting until it is absolutely dry.
Finish back of casting
It is normal for the final surface layer to have a slightly textured orange peel' appearance.
To protect table tops and provide a more finished look, you may want to cut a piece of felt or sheet cork and glue it to the base of your cast piece. Epoxy glue or bond cement works well.
To remove minor blemishes such as fingerprints, spray with several coats of Resin Craft Surface Coat spray, which is a clear acrylic sealer.